[Tutorial] Jailbreak iOS 4.2.1 / 4.2.6 con GreenPois0n RC6 [iPad/iPhone/iPT/ATV]

Para dar las gracias debes entrar o registrarte en el foro

iMiembro Pro 6G
iMiembro Pro 6G
Mensajes: 4651 Agradecido: 1998
04 Feb 2011, 13:54# 1
Imagen


Estas son las instrucciones sobre como hacer el jailbreak a un iPad, iPhone, iPod Touch o Apple TV con iOS 4.2.1 o a un iPhone 4 CDMA de Verizon con iOS 4.2.6 utilizando Greenpois0n RC6.1

Si ya tienes hecho el jailbreak tethered con RedSn0w y quieres que sea untethered pincha aquí: Pasar de jailbreak 4.2.1 tethered a untethered con GreenPois0n

Dispositivos compatibles:


Notas para usuarios de iPhone:
Spoiler:
  • Este jailbreak no hacktiva tu iPhone, lo tendrás que hacer con una SIM válida e iTunes.
  • Una vez hecho el jailbreak no intentes restaurar desde el iPhone o puede que se quede bloqueado y tengas que restaurarlo del todo con iTunes.
  • Si tienes un iPhone y lo quieres liberar mediante UltraSn0w lee esto:
    Importante:Si tienes un iPhone 3G o 3GS y no quieres subir la baseband para hacerle unlock no realices este tutorial, usa Sn0wbreeze(Windows) o Pwnage Tool (Mac OS X).

    Si tienes un iPhone 4 puedes actualizar al iOS 4.2.1 sin actualizar tu baseband usando TinyUmbrella. Pulsas el botón
    Start TSS Server -> Arrancas iTunes -> Conectas por USB tu iPhone -> Restauras a la 4.2.1 -> Te saldrá el Error 1013 -> Pones el iPhone en modo DFU -> Y Lanzas el GreenPois0n siguiendo con este tutorial ;)

    Más info de la web de TinyUmbrella:
    "Prevent iPhone4 Baseband Update

    This page ONLY deals with iPhone 4 baseband protection. I'm sorry this will not work for any other device.

    You can protect your iPhone 4 BB restoring to iOS 4.2.1. Follow these steps exactly:

    1. Get the latest TinyUmbrella.
    2. Get the latest greenpois0n rc5 update (http://greenpois0n.com)
    3. Open TinyUmbrella
    4. Plug in your device and save SHSH (make sure 4.2.1 SHSH were saved, if not don't bother continuing)
    5. Start TSS Server (If you get errors read the help section or FAQs or comment below typically it fails because you have some kind of web sharing enabled... use google to fix it - your issue really not much I can do...)
    6. Open iTunes
    7. Select your device in iTunes
    8. Shift(windows) / Option(Mac) restore -> Select the 4.2.1 ipsw
    9. Restore SHOULD error with a 1013 error. Click the "ok's" and close iTunes.
    10. With your device sitting with the usb pointing to iTunes (recovery mode), enter DFU by pressing and holding HOME + POWER until your screen goes black... then after a count of 2 (1.5-2 seconds) let go of POWER but keep holding HOME. If all goes well you will see nothing but a black screen. If your timing is even a LITTLE bit off, you will see the apple logo and your phone will boot back into recovery mode... Go back to step 10 and try again.
    11. You're now in DFU mode. Start greenpois0n and press 'Jailbreak'
    12. Once greenpois0n has finished its thing. Press 'Complete!'
    13. Let your device restart. You should end up on the activation screen.
    14. Congrats your baseband was preserved and you are now on 4.2.1

    If you get a 16XX error then try entering DFU and go to step 5.
    If your restore does NOT end in a 1013, it means your baseband was updated. This is likely because you did not have the TSS server running OR you updated without TinyUmbrella OR you are working with a device OTHER than iPhone 4.
    "


    Si aún así has subido la baseband mira esto: [Tutorial] Liberar un iPhone 3G/3Gs con baseband 05.14 o 05.15 con UltraSn0w 1.2


Sistemas operativos compatibles:

  • Windows (XP, Vista o 7)
  • Mac OS X

Requisitos:


Pasos a seguir:

    1. Descargate el archivo y haz doble clic sobre el .zip para extraerlo (por algunos comentarios en el foro es recomendable hacerlo en el escritorio), a continuación haz doble clic en greenpois0n para iniciar la aplicación. Si utilizas Windows es recomendable abrir el archivo greenpois0n.exe haciendo click derecho y pinchando en ejecutar como administrador.

    POSIBLE ERROR:
    Spoiler:
    Si utilizas Mac y no puedes abrir el archivo greenpois0n.app por mucho que lo inetentes es que tienes que usar la versión GreenPois0n RC5-3 disponible al principio de este tutorial o pásate por este enlace de los comentarios donde se habla de una posible solución.


    Imagen

    (Imagen Windows)


    Imagen

    (Imagen Mac)


    2. Conecta tu dispositivo (iPad, iPhone...) al ordenador, a continuación apaga tu dispositivo, haz clic en el botón de jailbreak (Prepare to jailbreak (DFU) en Windows)


    (Win) (Mac)


    3. Ahora recibirás instrucciones sobre cómo colocar tu dispositivo en modo DFU. [Más info sobre DFU]

    Te pedirá que presiones y mantengas presionado el botón de reposo (Power) durante 3 segundos.

    Imagen


    Manteniendo pulsado el botón Power pulsa la tecla de inicio (Home) durante 10 segundos.

    Imagen


    Suelta el botón Power sin soltar el botón de Home.

    Imagen


    4. Una vez que tu iDevice está en modo DFU con éxito empezamos con el jailbreak pinchando en el botón Jailbreak! (Puede que en Mac no te pida dar a ningún botón y comience solo).

    Imagen

    Windows


    Imagen

    Mac


    5. Una vez que Greenpois0n te informa de que ha terminado se puede soltar el botón Home. Haz click en el botón Quit(Windows) o Complete!(Mac) para cerrar la aplicación.

    Imagen


    Entonces se reinicia en modo verbose, verás texto en línea de comandos corriendo en tu dispositivo.

    POSIBLES ERRORES:
    Spoiler:
    • Si te aparece el mensaje 'failed' y se corta el jailbreak sigue este enlace.

    • Si el jailbreak se realiza correctamente pero después se queda la pantalla negra lo mejor es esperar unos minutos (3 o 4) y luego pulsar los botones Home y Power durante unos 10 segundos, entonces debería arrancar.
    • Otro problema que a algunos usuarios les da es que el dispositivo no continua mostrando este texto:

      Unable to find gBdevList
      Unable to find fs_mount
      Unable to find fs_unmount
      Unable fot find fs_load_file
      Green poision initialized


      Eso es por usar la versión RC5, debes volver a intentarlo con la nueva versión GreenPois0n RC5-2 disponible en este tutorial


    6. Una vez que se reinicie notarás que aparece el icono Loader en tu pantalla de inicio:

    Imagen


    7. Ábrelo y selecciona Cydia para instalarlo. (Puede haber sobrecarga del servidor, reinténtalo hasta que lo consiguas ;) )

    POSIBLE ERROR:
    Spoiler:
    Si al entrar en el loader la pantalla se queda en blanco y no puedes instalar Cydia lo que puedes hacer es instalarlo con RedSn0w siguiendo los pasos del 1 al 8 de este tutorial: [Tutorial] Jailbreak iOS 4.2.1 con RedSn0w 0.9.6rc8 [iPad/iPhone/iPT/Apple TV]. Recuerda marcar solo la casilla de Install Cydia y tranquilo, tu dispositivo seguirá siendo untethered ;)


    ImagenImagen


    8. Una vez Cydia se ha instalado correctamente puedes borrar la app Loader en Opciones y luego en Remove Loader.app.

    ImagenImagen


    9. Reinicia el dispositivo y ejecuta Cydia. Deja que haga todas las actualizaciones necesarias y ya tienes tu jailbreak 4.2.1 untethered :D .

    Imagen


Readme del Chronic Dev-Team:
Spoiler:
*** greenpois0n 1.0 RC6 ***

> Description of the software:

greenpois0n will Jailbreak your iDevice.

> Supported iDevices:

- iPod Touch 2G (all bootroms)
- iPod Touch 3G
- iPod Touch 4G
- iPad 1G
- iPhone 3Gs (all bootroms)
- iPhone 4
- iPhone 4 Verizon
- Apple TV 2

> Changelog:

- RC6: Apple TV 2 support, fixed emulators compatibility issues with greenpois0n
- RC5.4: Verizon iPhone 4 is now supported !

> Requirements (check this !)

- a supported device (see above)
- the device should run iOS 4.2.1 (4.2.6 for iPhone 4 Verizon). Please check on the device in the Settings -> General -> About page.
If your device is running an older version, please upgrade iOS first using iTunes.
*** If you want to SIM Unlock, preserve your baseband using TinyUmbrella (iPhone 4 only) or PwnageTool ***
- at least MacOSX 10.5
- OSX in a VM won't work
- a working internet connection

> Notes (checks this also !)

- if your device is jailbroken with iPhone Dev Team's Monte, please restore the device using iTunes first.
- if Cydia doesn't show up after Loader, you may need to reboot the device
- this version of greenpois0n doesn't include a patched activation system. You'll need to activate your device using iTunes
- WE DO NOT SUPPORT PIRACY !

> Instructions

1. plug the device to your computer using the USB cable
2. quit iTunes if it shows up
3. start greenpois0n.app
4. follow instructions
5. the device will boot a 1st time with verbose text on screen. This operation will install the jailbreak on the device.
6. the device will reboot normally
7. start the Loader application (green icon on the SpringBoard), and follow instructions to install Cydia

> In case of troubles

1. try to start greenpois0n from a terminal : sudo .//Contents/MacOS/greenpois0n
It'll give you more informations on the reason of the problem
2. check if somebody had the same issue : http://jailbreakqa.com/
3. join us on IRC : irc.chronic-dev.org #greenpois0n

> Source code

greenpois0n public source repositories will be updated soon

> Credits (alphabetical order)

Chronic-Dev Team (follow us on twitter):
- AriX : @AriX
- |bile| : @nitoTV
- chronic : @chronic
- DHowett : @DHowett
- jan0 : @0naj
- Jaywalker : @Jaywalker9988
- OPK : @iOPK
- pod2g : @pod2g
- posixninja : @p0sixninja
- semaphore : @notcom
- westbaer : @westbaer

Contributions: chpwn, comex, geohot

People who helped (thank you!): GreySyntax, iH8sn0w, LunchBox, pod3g, ven000m, zodttd

> Donations:

Donations are always greatly appreciated and will permit to buy new devices to make tests for future jailbreaks. ( http://www.greenpois0n.com )


Vídeos con el resumen del proceso:


Más vídeos:

Spoiler:


Saludos!

---

Recomendaciones:

Cambio de versión iOS:

Posibles problemas:

Firmwares:

Más información:

Preguntas frecuentes (FAQ):
Última edición por Akuario el 17 Mar 2011, 23:10, editado 10 veces en total
Razón: Actualizado con nueva versión RC6.1
Etiquetado en:
iMiembro Pro 3G
iMiembro Pro 3G
Mensajes: 1221 Agradecido: 440
04 Feb 2011, 14:02# 2

Menos mal que te leo sino nos juntamos con 2 tutos :mrgreen::mrgreen::mrgreen:
Esta tarde lo probare en unos cuantos de varios compañeros
Gracias

Gracias  
iMiembro Pro 6G
iMiembro Pro 6G
Mensajes: 4651 Agradecido: 1998
04 Feb 2011, 14:09# 3
djmarko escribió:Menos mal que te leo sino nos juntamos con 2 tutos :mrgreen::mrgreen::mrgreen:
Esta tarde lo probare en unos cuantos de varios compañeros
Gracias


jajaja, no te preocupes, yo no tengo ahora un Mac, este tutorial lo he traducido de una página inglesa (al final lo he editado tanto que es propio), así que si el tuyo es propio será mejor, puedes ponerlo también en la sección de tutoriales o puedes ayudara a mejorar este, como veas, mejor que sobre que no que falte :P

Saludos!! emo:-:3
Gracias  
1 persona ha dado las gracias: akil3s
iMiembro
iMiembro
Mensajes: 19 Agradecido: 5
04 Feb 2011, 14:15# 4

Genial el tutorial, muchas gracias.

Cuando dices que es recomendable una version restaurada, es tal como viene de fabrica no?

Gracias  
iMiembro Pro 5G
iMiembro Pro 5G
Mensajes: 2329 Agradecido: 1728
04 Feb 2011, 14:28# 5

Sabes si vale para el 3gs con bootrom nuevo ?
gracias

-------------------------------------------------------
"Al final todo sale bien y si no sale bien es que no es el final."
--------------------------------------------------------
Normas ipad foros
--------------------------------------------------------
Gracias  
iMiembro Pro 6G
iMiembro Pro 6G
Mensajes: 4651 Agradecido: 1998
04 Feb 2011, 14:45# 6
renji escribió:Genial el tutorial, muchas gracias.

Cuando dices que es recomendable una version restaurada, es tal como viene de fabrica no?


Exacto, con la iOS 4.2.1 recien instalada mediante el botón restaurar de iTunes ;)
Gracias  
iMiembro Pro 6G
iMiembro Pro 6G
Mensajes: 4651 Agradecido: 1998
04 Feb 2011, 14:49# 7
tioma escribió:Sabes si vale para el 3gs con bootrom nuevo ?
gracias


Sí claro, en principio vale para todos los dispositivos iOS que eran tethered con RedSn0w, es decir, los 3Gs con bootrom nuevo, los 4, iPads y iPod Touchs a desde el 2G MC. ;)

De todas formas voy a poner la lista de compatibilidad en el tuto.
Gracias  
1 persona ha dado las gracias: tioma
iMiembro Pro 6G
iMiembro Pro 6G
Mensajes: 4651 Agradecido: 1998
04 Feb 2011, 15:49# 8

He leído que algunos usuarios tienen problemas con el jailbreak y le aparece esto en pantalla:

Unable to find gBdevList
Unable to find fs_mount
Unable to find fs_unmount
Unable fot find fs_load_file
Green poision initialized


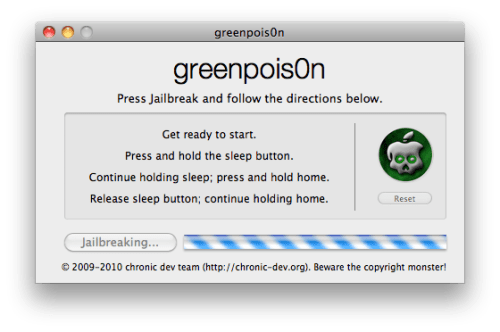
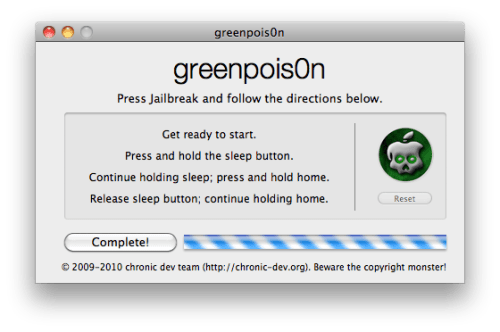
Pero en el GreenPois0n pone que se ha completado.

Posibles soluciones que he leído:

  • Reiniciar el dispositivo y pasar el jailbreak otra vez, puede que lo tengas que hacer hasta 3 veces.
  • Desconectar el USB y volver a conectarlo, entonces esperar un rato.

He actualizado el tutorial con esto.
Gracias  
iMiembro
iMiembro
Mensajes: 5 Agradecido: 0
04 Feb 2011, 16:18# 9

A mi lo que me pasa es que después de darle al botón "jailbreak" y seguir las instrucciones para entrar en modo DFU, nunca llega a salirme el botón de "complete", sino que me dice de intentarlo otra vez, sin embargo si abro itunes me dice que está en modo "restore" por lo que entiendo que si ha entrado en modo DFU. NO entiendo qué pasa.

Gracias  
iMiembro 6G
iMiembro 6G
Mensajes: 294 Agradecido: 36
04 Feb 2011, 16:43# 10

Entiendo que es jail unthetered?

Que es iPT del título?

Muchas GRACIAS!!! :thanks:

Gracias  

Publicidad
Publicidad